After a quite long holiday break we now continue our series about the Continuous Deployment Pipeline with Gradle and Docker.
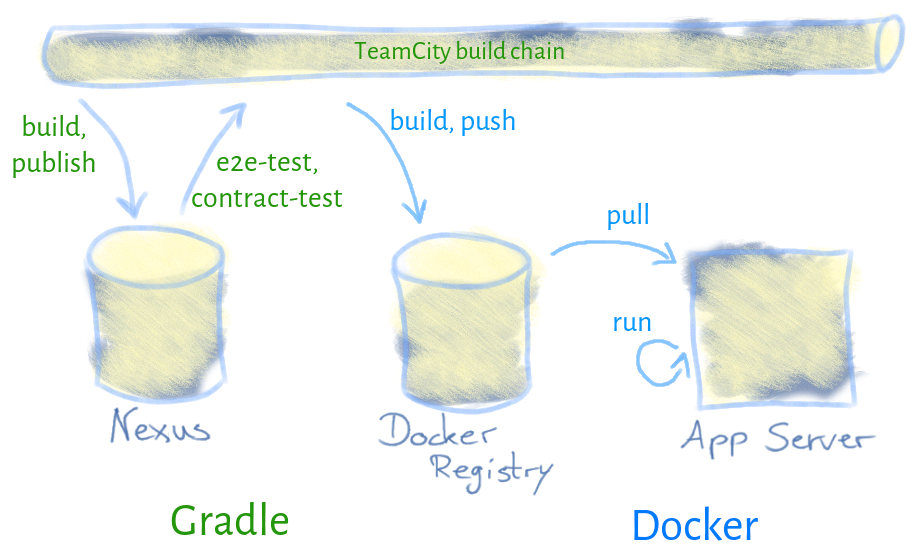
This post is about the first step where our build chain creates the Spring Boot packages and publishes them to our Nexus repository manager. As shown in the high-level overview below, it is only a quite small part of the complete pipeline:
Gradle and Spring Boot provide you a very convenient build and plugin system and work out of the box for standard builds. Yet, the devil is in the details. Our project consists of a multi module setup with the following subprojects:
- backend
- frontend
- common
- contract-test
- e2e-test
The projects backend and frontend are our main modules with each being deployed as a standalone application. They share the common project which contains the security and web config. The contract-test and e2e-test projects contain more integrative tests and will be discussed later in dedicated posts.
We’ll now take a deep dive into our build scripts and module structure. You can find the example source code on GitHub, where we provide a minimal, but working project with the important parts being described here.
Gradle project setup
A build on our CI-Server TeamCity uses the Gradle Wrapper by running the tasks build and publish. These tasks are called on the root level of our project. Our Gradle root project contains the common configuration so that the subprojects only need to configure minimal aspects or special plugins.
Shared dependency versions are defined in the root project, so that all subprojects use the same dependency versions. Gradle also allows you to define sets of dependencies, so that you can reference them as complete package without known its details. We call these sets libraries and you can find an example at the root build.gradle along with its usage in the dependency closure.
Using a common definition of dependencies sometimes isn’t enough, because you also have to handle transitive dependencies. You have the option to manage transitive dependencies by manually excluding or even redefining them. Another option we often use is to override clashing dependency versions by configuring the build script’s configuration. The resolutionStrategy can be configured to fail when version conflicts are recognized. The example project shows you how we globally manage our dependencies.
Spring Boot configuration
Building a Spring Boot application with Gradle is simplified with the help of the Spring Boot Gradle Plugin. The plugin configures your build script so that running gradle build depends on the bootRepackage task.
You’ll see in the backend and frontend build.gradle scripts, that we configure Gradle to replace a token in our source files with the artifactVersion. This special token replacement aims at setting the actual version in our application.properties file, which is used to configure Spring Boot. By adding a line like info.build.version=@example.version@ we enable the /info endpoint so that we can ask a running application about its version. The version will be used later in our deployment pipeline. Details on our artifact versioning scheme will be described in the section about publishing below.
Performing Node.js build tasks
Our backend build isn’t very spectacular, but our frontend build needs some more explanation. We implemented our frontend with AngularJS, but use Spring Boot to deliver the static resources and to implement security. Before packaging the AngularJS resources in the frontend artifact, we let Gradle perform a grunt release task. Grunt is a Node.js based task runner, which lets us run unit tests, minimize our frontend code or even images and package everything. Its result then needs to be copied to the public resources folder of Spring Boot.
Configuring a Node.js build in a platform neutral way isn’t one of the trivial tasks, but we use the gradle-grunt-plugin and the gradle-node-plugin which helps a lot. Apart from delegating the grunt release to the plugin we also configure the according grunt_release task to recognize inputs and outputs in the Gradle build script. The inputs and outputs help Gradle to decide if the task needs to be executed. If there haven’t been any source changes and the output still exists, the task is regarded up to date and will be skipped.
Publishing and versioning Gradle artifacts
With both frontend and backend being packaged as artifacts, we would like to publish them to our Nexus artifact repository. Nexus needs the well known set of groupId, artifactId and version to identify an artifact. The Gradle maven-publish plugin can be configured in a very convenient way to use the project’s group, name and version as Maven coordinates. As you can see in the example source code, we already configure the group in our root project. The subproject’s name fits our needs as artifactId, which leads us to the final property, the version.
We wanted the version to be unique and sortable by the artifact’s build time. We also didn’t want to maintain a version.txt in our project. Long story short, we defined our version to look like the scheme: yyyy-MM-dd'T'HH-mm-ss_git-commit-hash. The part before the _ corresponds to the build timestamp and the second part corresponds to the latest commit hash of the project’s git repository. That way we can quickly recognize when the artifact has been build with which commit in the project’s history.
The artifact version is generated on every build. Apart from updating our application.properties, we also use the artifact version to configure the publish task in our root project. The rest works out of the box, we only need to configure the Nexus publish url with username and password.
Build on a CI-Server
Our CI Server TeamCity now only needs to execute the gradlew clean build publish tasks to compile, perform all unit tests, package the Spring Boot applications and publish them to the artifact repository. That wouldn’t be enough, because we also want to perform integration tests and deploy the applications to our internal and production stages.
TeamCity provides a feature to declare so-called build artifacts, which can be used by subsequent build goals in our build chain. We want the other build goals to know the application version, so we write it into a text file on the build agent and pass it to all build goals in our pipeline. Every build goal then uses the version to fetch the artifact from Nexus. The image below shows all build goals of our build chain:
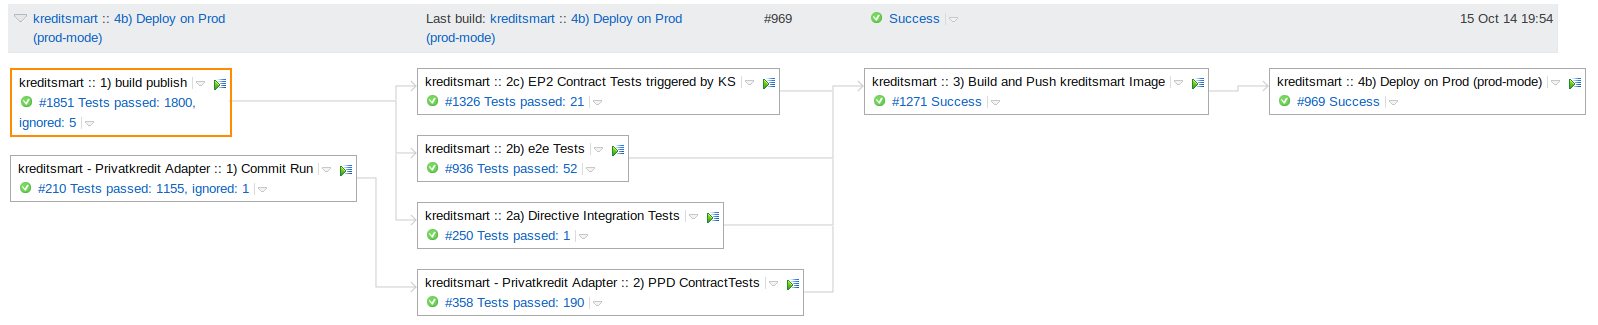
The selected yellow box in the build chain corresponds to the build step we described in this article. As promised, the next article in our series will describe you in detail how we perform our integrative e2e- and contract-tests. Comments and feedback here or @gesellix are welcome!